Stylist Brush Markers - 3 techniques to try!
Try these blending and drawing techniques and explore the versatility of our Stylist Brush Markers.
Total: $0.00
Try these blending and drawing techniques and explore the versatility of our Stylist Brush Markers.
Get your supplies!
Micador For Artists Stylist Brush Markers Box 24
Roymac Rains Watercolour Paper
A plastic sheet (acetate, sandwich or freezer bag will work)
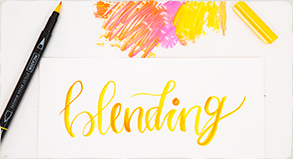
Technique 1: Blending with yellow
Choose 2 or more colours and, using your plastic sheet as a palette, apply swatches of the colour next to each other. We chose yellow as our light colour (start with the lightest colour first).

Technique 1 continued: Keep blending to create red highlights
Next, we chose the pink brush marker to mix with the yellow and create red highlights. Don’t worry about staining your brush marker nibs with different colours, our brush markers will self clean as you continue to draw.

Technique 2: Create a Wreath
Use the fine tip of your Sap Green Brush Marker to draw the circle outline of your wreath. Then, flip your marker and use the brush tip to press down and form teardrop or leaf shapes around the wreath outline. The brush nib is the soft enough to bend and stamp on the paper and makes a perfect leaf shape when applied like this.

Technique 3: Illustrate some lavender
Draw your stem with the fine tip of your Moss Green Brush Marker. Next, grab your Lavender Brush Marker and use the same technique for drawing a wreath. Ensure you join two strokes together at the base to make a heart shape. You could also use the Purple Brush Marker.
false