The dream of The Thylacine
A fun art activity, which involves recreating the cover of The Dream of the Thylacine.
Total: $0.00
A fun art activity, which involves recreating the cover of The Dream of the Thylacine.

Step 1:
Draw in simple lines to mark where the landscape will lie. Ask your students to consider where in the landscape the Thylacine will be and to be mindful of size.

Step 2:
Consider the width and shape of the animal and then sketch an outline or guiding marks. Older students might like to try this ‘slinky’ technique. Use some strokes over the structural framework to fill out the body.
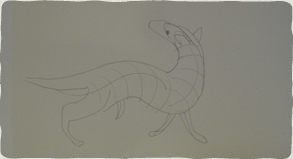
Step 3:
Fill in the animal, adding limbs, a head and basic features. Use the original image as a guide.

Step 4:
Draw in a line for the horizon. Sketch in some large rocks scattered through the foreground as well as a river. Flesh out the horizon with some mountains in the background. Then sketch some simple trees into the foreground. Ask your students to consider scale and distance when drawing these details.

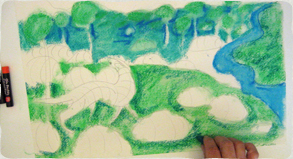
Step 5:
Time for some colour! Using oil pastels, colour the middle ground a dark green, with touches of dark blue to add depth. Use dark green to create foliage in the trees.

Step 6:
Dip a brush in canola oil (be careful not to use too much) and blend in the colour using careful circular movements. This technique is known as “scumbling”.

Step 7:
Add some lighter blue to the river and blend using the “scumbling” technique from the previous step. Students are free to add a little darker blue for emphasis, if they like. Add some dark green to the foreground around the Thylacine and the rocks then blend with the oil.
Step 8:
Add some streaks of dark blue through the green in the foreground, and then “scumble” it in so it blends.

Step 9:
Add some warm, earthy colours to the to the rocks in the foreground. Try and blend a mixture of orange and yellow ochre, then finish with a little purple which you can either blend or leave dry over the top. Encourage your students to make warm colours predominate and use cooler colours for shadow to help separate each rock from its surroundings.

Step 10:
Time to add some colour to the Thylacine! Start by laying down some yellow ochre as the base. Add some red stripes and gently blend them in. A little dark blue around the body, but not all over it will help the animal stand out from the background. Pastel in a touch of white to his head and blend into the body, being careful not to damage the stripes.

Step 11:
Time to bring those mountains to life! Choose a couple of colours you want to work with (here we’ve used pink and purple) and blend them together into the mountain range.

Step 12:
Shade the sky in lightly with light blue pastel, with touches of pink and orange if you like. Make sure you leave some patches of white to form the impression of clouds.

Step 13:
At this point, start to emphasise colour around the whole picture. Add a little dark blue around the rocks, left unblended to imply shadow. A thin line of black outlining the thylacines body and legs will help him pop forward from the background while still looking like he belongs to the whole landscape.

Step 14:
For a final touch, use a white pastel to go over the tree trunks and sky – especially the clouds. The bold patches of white will make all the warm colours seem bolder and brighter. Now your Thylacine is done! Give him a name and he can now run again in his own special place, wild and free!
false